Why not?
This question came up during our last play session. Building a mod that restricts buying or selling anything the first year isn’t a complex change to the game’s world. However, neither of us know how to code so this would be a good chance to see how far we could get with AI. A discussion about AI and modding will be at the end. The only creative change needed to the game’s world should be adding a bit of dialogue for each NPC that stops the player buying things.
Starting Out
We used Perplexity AI to guide us through the process. The model settings were for the best model available. Below are the steps generated by Perplexity followed by our notes about the process. Grey boxes are the AI instructions and black boxes with white colored font are my thoughts on the process.
1. Install SMAPI on macOS
- Make sure you’re on macOS 10.15 Catalina or later so SMAPI and Stardew’s .NET version work correctly.
- Download the latest SMAPI for macOS from smapi.io.
- Unzip it, then right‑click
install on Mac.command(orinstall on macOS.command) and choose Open, then follow the prompts to point it at your Stardew Valley app. - After it finishes, launch Stardew once via Steam like normal; SMAPI will open in Terminal and show a console window when it’s working.
Your Mods folder will usually end up under:
1. Install SMAPI on macOS notes
The directions included links to references and SDV wiki’s directions are pretty close to being idiot proof. Link: https://stardewvalleywiki.com/Modding:Installing_SMAPI_on_Mac_Pictorial_Guide#Install_SMAPI
I’m a casual user of Macs so it was nice to learn about alias folders on desktops.
Started the game with SMAPI installed and had no issues.
2. Set up your C# dev tools on Mac
You have two main options:
- Visual Studio for Mac (if you already use it) or
- Visual Studio Code + .NET SDK, which is lightweight and works well on macOS.
For VS Code:
- Install the .NET SDK that matches Stardew’s SMAPI requirements (NET 6 / NET 5 depending on your versions) plus the C# and .NET support extensions.
- Follow a short setup like the “Building Stardew Valley Mods using SMAPI in VS Code” guide: it walks through creating a C# library project, adding SMAPI references, and setting up build tasks on macOS.
2. Set up your C# dev tools on Mac notes
The directions offered a few different tutorials to follow and I found this to be the most helpful: https://stardewvalleywiki.com/Modding:Modder_Guide/Get_Started
I wanted to try a non-microsoft option, so I went with Jetbrains software Rider: https://www.jetbrains.com/rider/
This required updating Perplexity’s directions for Jetbrains, as it really pushed the Microsoft products. Perplexity’s new responses pointed me in the right direction but wasn’t very specific about what to do exactly for each step, as you’ll see below.
3. Create a new Stardew SMAPI mod project in Rider
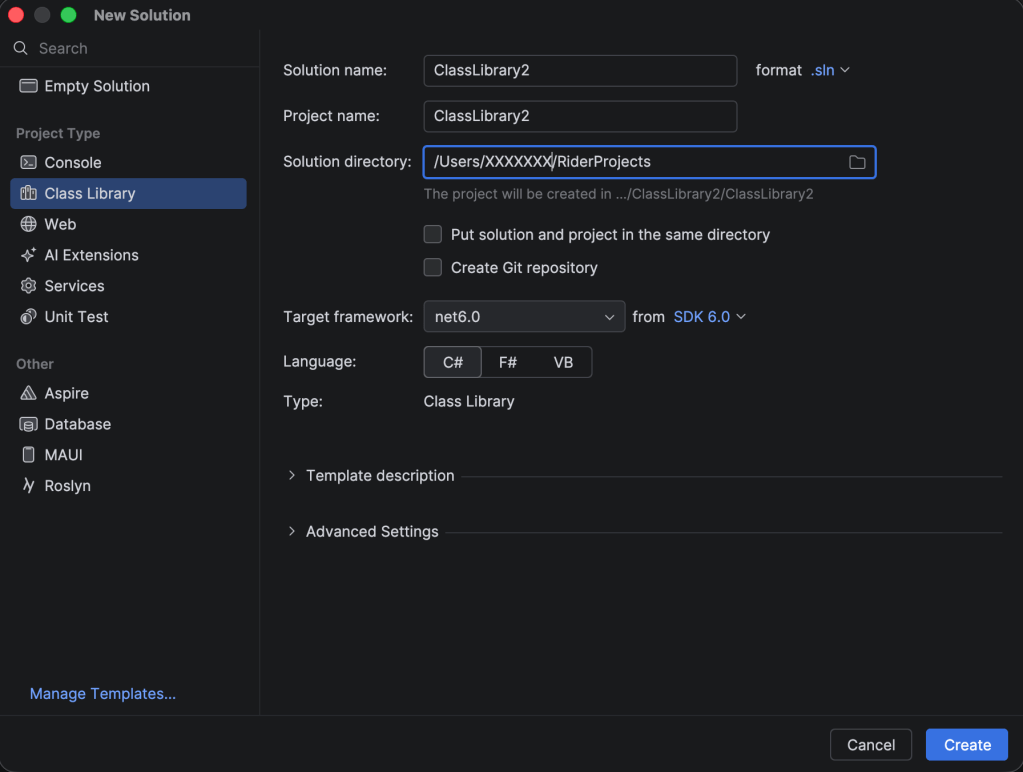
3.1. New project
- In Rider: File → New Solution.
- Choose .NET → Class Library (or “Console Application” and then change to Class Library later, but Class Library is ideal).
- Name it something like
NoCommerceYearOneand pick a location you like (not inside the game folder). - Target framework: pick the same .NET you see listed in Stardew/SMAPI docs (usually
net6.0with current versions).
Rider will create:
- A
.csprojfile. - A default
Class1.csfile.
You’ll replace that with your ModEntry class.
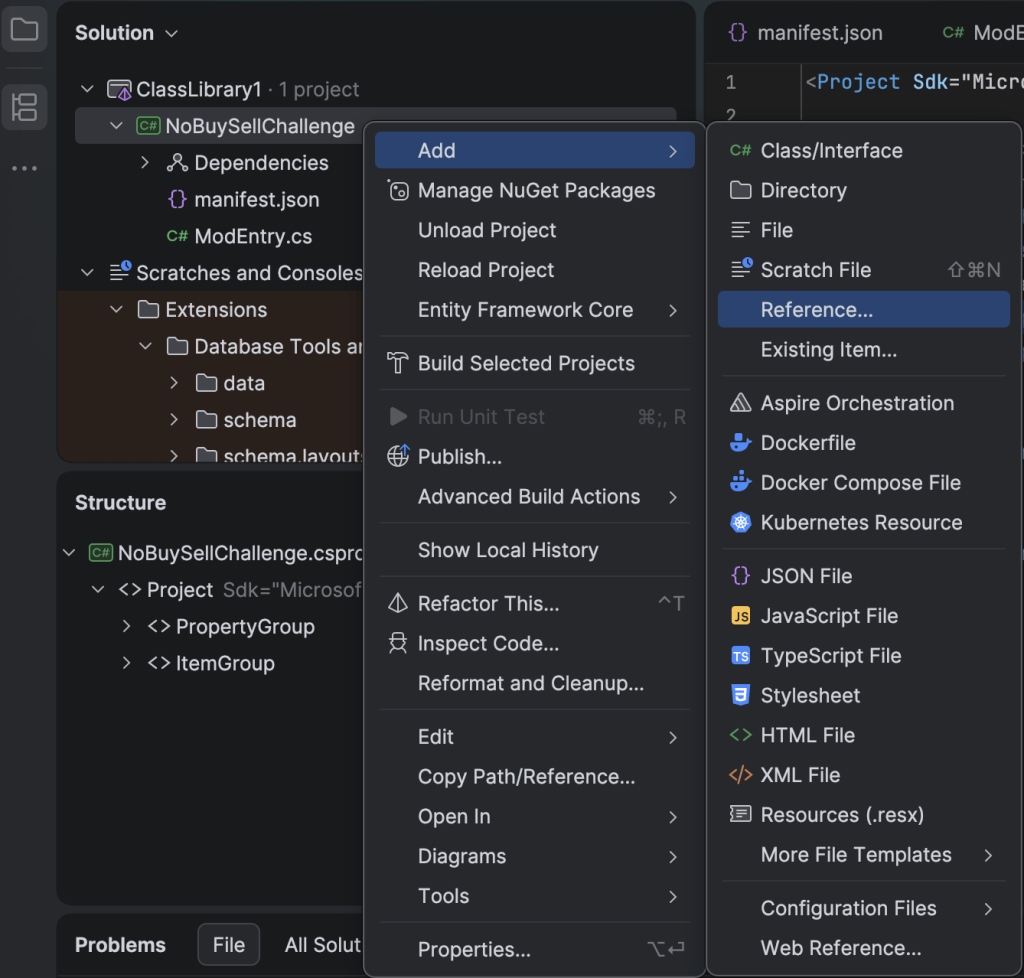
3.2. Add references to Stardew and SMAPI
You need Rider to know about the game and SMAPI assemblies.
- Locate your Stardew + SMAPI install on Mac:
- For Steam, it’s usually under
~/Library/Application Support/Steam/steamapps/common/Stardew Valley/Contents/MacOS/(with theStardew Valley.appbundle structure).
- For Steam, it’s usually under
- Inside the app bundle, find the
Stardew Valley.dllandStardewModdingAPI.dll(often inContents/Resourcesor same folder as the game executable). - In Rider, right‑click your project → Add → Add Reference….
- Choose Browse, navigate to those DLLs, and add:
StardewModdingAPI.dllStardew Valley.dll
Rider now knows all the SMAPI and game types like Mod, Game1, ShopMenu, etc.
3. Create a new Stardew SMAPI mod project in Rider notes
This wasn’t 100% intuitive about where to click or verify that I had referenced the two .DLL files correctly. It look a bit of trial and error to make sure I followed the steps correctly.
How to make a new solution
Under class library, make sure you are using the latest net target framework (6.0 for this version of SDV). I kept the solution and project name the same. Solution name is comparable to a folder that stores multiple projects associated with what you’re building.
How to add references
This took a minute to figure out. This was found by right clicking on the C# dropdown menu. Using alias folders made it easier to get to the Stardew Valley.dll and StardewModdingAPI.dll files.
4. Add your SMAPI manifest and main mod class
4.1. Add manifest.json
- Right‑click the project → Add → New File → JSON File and name it
manifest.json. - Paste something like:
json{
  "Name": "No Commerce Year One",
  "Author": "YourName",
  "Version": "1.0.0",
  "Description": "Disables buying and selling during year 1.",
  "UniqueID": "yourname.NoCommerceYearOne",
  "EntryDll": "NoCommerceYearOne.dll",
  "MinimumApiVersion": "4.0.0"
}
Make sure EntryDll matches the name of your build DLL (NoCommerceYearOne.dll if that’s your project name).
4.2. Add your ModEntry class
- Delete
Class1.cs. - Right‑click the project → Add → New C# Class → name it
ModEntry.cs. - Paste and adapt the basic SMAPI structure (this is a sketch; we’d refine it once we know your SMAPI version):
csharpusing StardewModdingAPI;
using StardewModdingAPI.Events;
using StardewValley;
using StardewValley.Menus;

namespace NoCommerceYearOne
{
    public class ModEntry : Mod
    {
        public override void Entry(IModHelper helper)
        {
            helper.Events.Display.MenuChanged += OnMenuChanged;
        }

        private void OnMenuChanged(object? sender, MenuChangedEventArgs e)
        {
            if (Game1.year != 1)
                return;

            if (e.NewMenu is ShopMenu shop)
            {
                Game1.ShowRedMessage("No buying or selling in year 1!");

                shop.onPurchase = (item, farmer, amount) =>
                {
                    Game1.showRedMessage("You can't buy anything in year 1.");
                    // Intentionally do nothing: no item added, no money spent.
                };

                // Selling block: this part depends on the ShopMenu API in your SMAPI version.
                // Once you confirm your SMAPI version, we can wire a specific pattern here.
            }
        }
    }
}
This wires into the menu‑change event and modifies shop behavior when Game1.year == 1. The exact selling hook may need adjusting once we look at the current ShopMenu in your SMAPI/game version.
4. Add your SMAPI manifest and main mod class notes
This was easier to follow after figuring out where I needed to add files from. The code has a bunch of errors I’ll have to figure out after I get through all the steps.
Adding a json file comes from right clicking the C# icon under the folder structure, as done in the previous step to add references.
I don’t know why you had to delete the default Class1.cs file. I just renamed it and copy and pasted the code.
5. Configure build output and build the mod in Rider
- Open the
.csprojin Rider’s editor and confirm the target framework (e.g.,<TargetFramework>net6.0</TargetFramework>). - Optional but nice: set the output path to something simple, for example:
xml<PropertyGroup>
  <TargetFramework>net6.0</TargetFramework>
  <OutputPath>bin/SMAPI/</OutputPath>
</PropertyGroup>
- Use Build → Build Solution (or the hammer icon).
- After a successful build, Rider will show the compiled DLL in
bin/SMAPI(or the defaultbin/Debug/net6.0if you didn’t changeOutputPath).
5. Configure build output and build the mod in Rider notes
I got stuck here for over an hour because I didn’t think I had a correct .csproj file. I went through the directions again and got confused about this part in step 3:
Choose .NET → Class Library (or “Console Application” and then change to Class Library later, but Class Library is ideal).
Thinking I missed a step, I reinstalled Rider four times, twice manually and twice through JetBrains Tool Box App (works like Adobe’s Creative Cloud suite). Link here: https://www.jetbrains.com/toolbox-app/. Once I figured out everything was working correctly I asked for help doing step 5 in detail. Below are the directions it gave me.
5a. Open and edit the .csproj in Rider
- In Rider’s left panel (Solution/Explorer), find your project (for example
NoCommerceYearOne). - Right‑click the project name (the one with the C# icon).
- Click Edit Project File. This opens the
.csprojXML in the editor.
You’ll see something like:
xml<Project Sdk="Microsoft.NET.Sdk">
  <PropertyGroup>
    <TargetFramework>net8.0</TargetFramework>
    <!-- maybe other lines here -->
  </PropertyGroup>
</Project>
(Your TargetFramework might be net8.0, net7.0, etc.)
5b. Set TargetFramework and OutputPath
- Inside the
<PropertyGroup>block, find the<TargetFramework>line. - Change it so it reads exactly:
xml<TargetFramework>net6.0</TargetFramework>
5c. On the next line (still inside the same <PropertyGroup>), add:
<OutputPath>bin/SMAPI/</OutputPath>
So the full section looks like:
<Project Sdk="Microsoft.NET.Sdk">

  <PropertyGroup>
    <TargetFramework>net6.0</TargetFramework>
    <OutputPath>bin/SMAPI/</OutputPath>
  </PropertyGroup>
</Project>
If Rider added extra properties (like ImplicitUsings or Nullable), leave them, just make sure TargetFramework is net6.0 and OutputPath is somewhere inside <PropertyGroup>(order doesn’t matter).
5d. Press ⌘S to save the .csproj.
Getting detailed directions is something I’ve done before in the past with other software that wasn’t user friendly, such as Tableau. Unless your prompt states you have no experience with the software, it assumes a base level of proficiency.
6. Build the mod in Rider
- At the top menu, click Build → Build Solution.
- Or click the hammer icon in the toolbar.
- Watch the bottom panel (Build/Problems). Wait until it says Build succeeded with no red errors.
If it says Build failed, copy the first red error line text and I’ll help fix it.
6. Build the mod in Rider notes
I knew this wasn’t going to work based on the list of errors I saw. I got a “Build Complete” but with 6 errors and 2 warnings.
Errors
0>ModEntry.cs(4,2): Error CS1513 : } expected
0>ModEntry.cs(5,1): Error CS1529 : A using clause must precede all other elements defined in the namespace except extern alias declarations
0>ModEntry.cs(6,1): Error CS1529 : A using clause must precede all other elements defined in the namespace except extern alias declarations
0>ModEntry.cs(7,1): Error CS1529 : A using clause must precede all other elements defined in the namespace except extern alias declarations
0>ModEntry.cs(8,1): Error CS1529 : A using clause must precede all other elements defined in the namespace except extern alias declarations
0>ModEntry.cs(41,1): Error CS1022 : Type or namespace definition, or end-of-file expected
I passed these errors to Perplexity and it gave me new code to try. Below is the code’s second draft.
using StardewModdingAPI;using StardewModdingAPI.Events;using StardewValley;using StardewValley.Menus;namespace NoSellChallenge{ public class ModEntry : Mod { public override void Entry(IModHelper helper) { helper.Events.Display.MenuChanged += OnMenuChanged; } private void OnMenuChanged(object? sender, MenuChangedEventArgs e) { if (Game1.year != 1) return; if (e.NewMenu is ShopMenu shop) { Game1.ShowRedMessage("No buying or selling in year 1!"); shop.onPurchase = (item, farmer, amount) => { Game1.showRedMessage("You can't buy anything in year 1."); // Intentionally do nothing: no item purchased. }; } } }}
Compiling this resulted in two errors. I passed these new errors to Perplexity who gave the following explanation:
Fix the red message call
In newer versions the method is showRedMessage (lowercase s), not ShowRedMessage. Your code currently has:
csharpGame1.ShowRedMessage("No buying or selling in year 1!");
Change it to:
csharpGame1.showRedMessage("No buying or selling in year 1.");
Now both message lines use showRedMessage.
Fix the onPurchase delegate parameters
The signature of ShopMenu.OnPurchaseDelegate in recent Stardew/SMAPI versions is typically:
csharpvoid OnPurchaseDelegate(ISalable item, Farmer who, int amount);
or with extra optional parameters depending on version.
Your error says it doesn’t take 3 arguments, so we’ll drop the amount parameter and accept only the ones SMAPI expects in your version.
Replace this:
csharpshop.onPurchase = (item, farmer, amount) =>
{
    Game1.showRedMessage("You can't buy anything in year 1.");
    // Intentionally do nothing: no item purchased.
};
with this:
csharpshop.onPurchase = (item, farmer) =>
{
    Game1.showRedMessage("You can't buy anything in year 1.");
    // Intentionally do nothing: no item purchased.
};
If Rider then complains it does expect 3 parameters, change it to:
csharpshop.onPurchase = (item, farmer, amount) =>
{
    Game1.showRedMessage("You can't buy anything in year 1.");
};
and we’ll add/remove a parameter based on the exact error text, but try the 2‑parameter version first.
I did these updates and now have one error remaining:
0>ModEntry.cs(24,50): Error CS1593 : Delegate ‘ShopMenu.OnPurchaseDelegate’ does not take 2 arguments
Passed this back to Perplexity and got the following updated instructions:
Update the onPurchase lambda to use all arguments
Change your if (e.NewMenu is ShopMenu shop) block to this version:
csharpif (e.NewMenu is ShopMenu shop)
{
    Game1.showRedMessage("No buying or selling in year 1.");

    shop.onPurchase = (item, farmer, stack, amountToBuy, stock) =>
    {
        Game1.showRedMessage("You can't buy anything in year 1.");
        // Intentionally do nothing: don't modify money or inventory.
    };
}
This matches the newer documented delegate that includes the stock info as extra parameters.
Make sure you remove any old onPurchase = ... line so there’s only this one.
I wasn’t pasting in the full error log, so I ended up getting back and forth with Perplexity’s guesses on how to fix the last error. Pasting the full error log gave me simpler code to try.
using StardewModdingAPI;
using StardewModdingAPI.Events;
using StardewValley;
using StardewValley.Menus;
namespace NoSellChallenge
{
public class ModEntry : Mod
{
public override void Entry(IModHelper helper)
{
helper.Events.Display.MenuChanged += OnMenuChanged;
}
private void OnMenuChanged(object? sender, MenuChangedEventArgs e)
{
if (Game1.year != 1)
return;
if (e.NewMenu is ShopMenu)
{
Game1.showRedMessage(“No buying or selling in year 1.”);
Game1.exitActiveMenu();
}
}
}
}
7. Rebuild and test
- Save
ModEntry.cs. - In Rider, Build → Build Solution.
- Confirm there are no red errors (the architecture warnings are OK to ignore for now).
If it builds successfully:
- Copy your
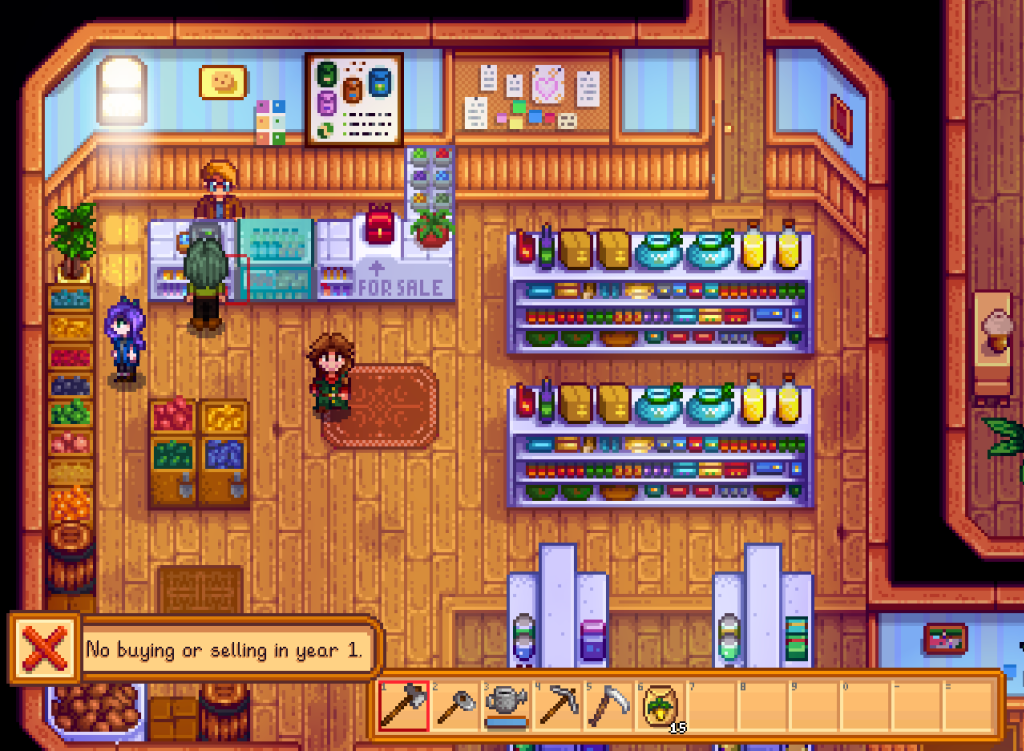
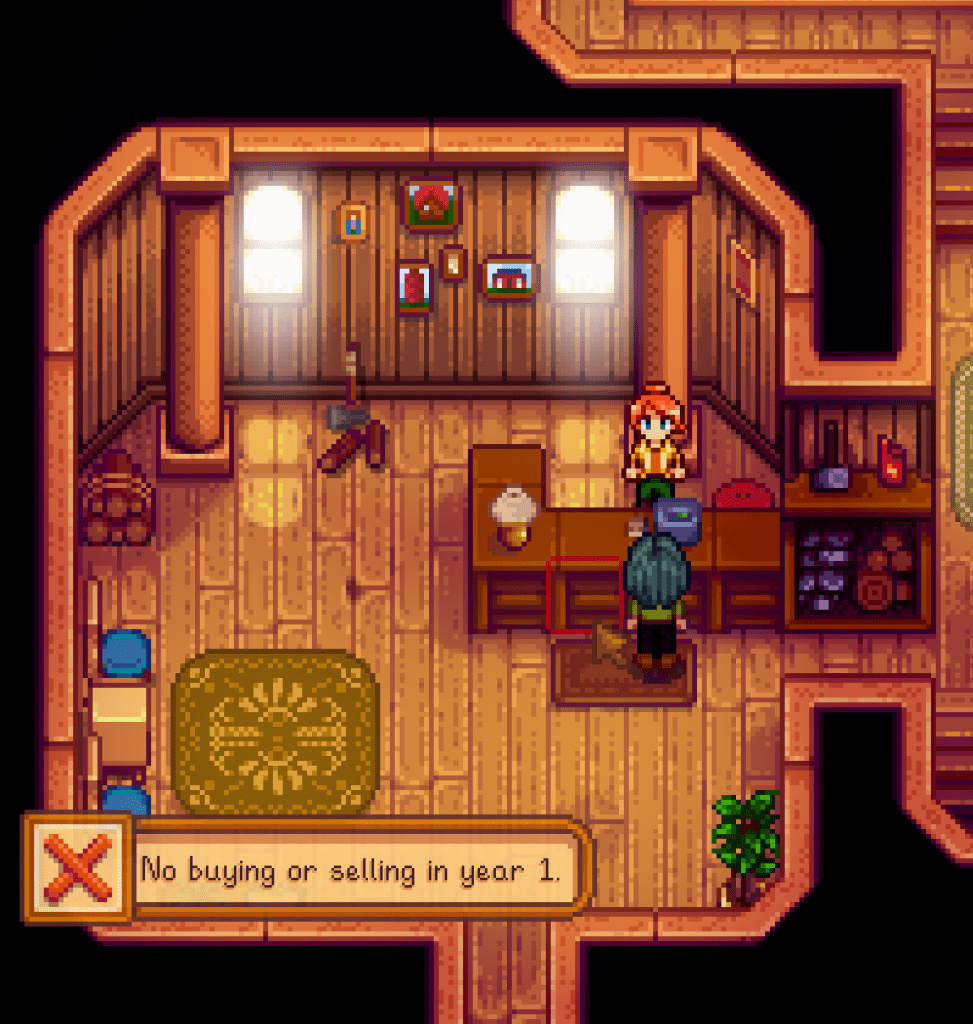
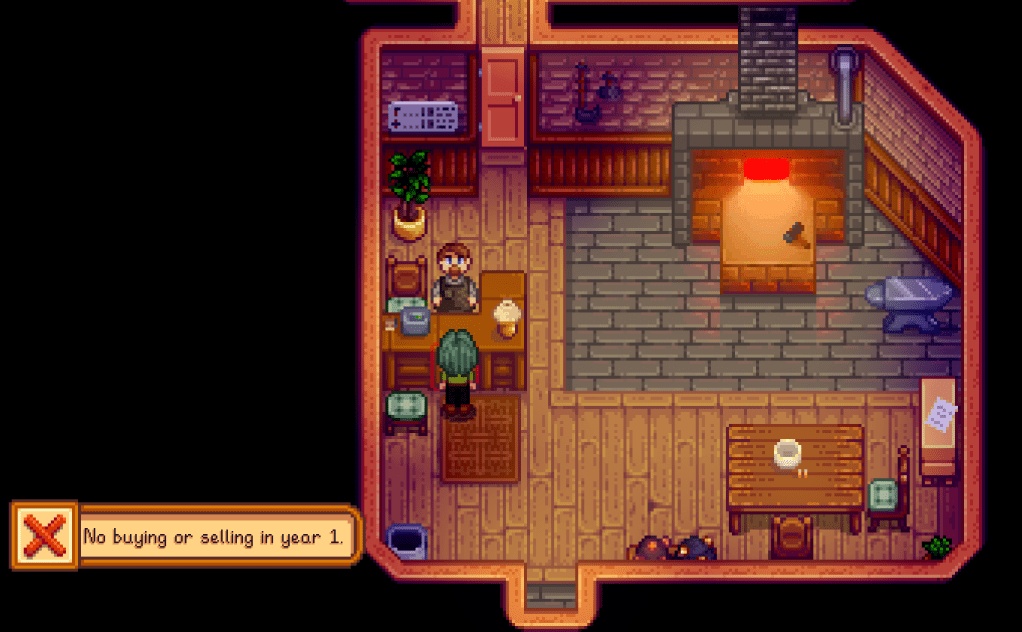
NoBuySellChallenge.dllfrombin/SMAPIplusmanifest.jsoninto your SMAPIMods/NoBuySellChallengefolder. - Start a new save in Stardew, in year 1, and try to open Pierre’s or any other shop. It should flash the red message and immediately close.
If you later want a more nuanced behavior (e.g., allow opening the shop but silently blocking transactions), we can then look up the exact OnPurchaseDelegate signature from your Stardew Valley.dll using a decompiler and match it precisely, but this version gives you the “no buying or selling for the first year” challenge behavior right now
Rereading these directions to do another mod wasn’t very clear to me. Here’s the break down of what to do:
What the files are
NoBuySellChallenge.dllis the compiled mod code that Rider builds from your C# project.manifest.jsonis the metadata file SMAPI uses to recognize the mod, including the mod name and the DLL it should load viaEntryDll.
SMAPI expects each mod to live in its own folder under Mods, with the manifest in that same folder.
What “bin/SMAPI” means
In many Stardew mod projects, your compiled output ends up in a build folder such as bin/Debug/... or a custom SMAPI output folder, depending on your project setup and build config.
So “from bin/SMAPI” means “from the folder where Rider put the built DLL for your mod.”
If you don’t literally see a folder named bin/SMAPI, look in your project’s bin folder for the most recent .dll that matches your mod name.
What to copy where
Your end result should look like this structure:
Stardew Valley/
└── Mods/
    └── NoBuySellChallenge/
        ├── NoBuySellChallenge.dll
        └── manifest.json
That folder layout is what SMAPI looks for when loading mods.
7. Rebuild and test notes
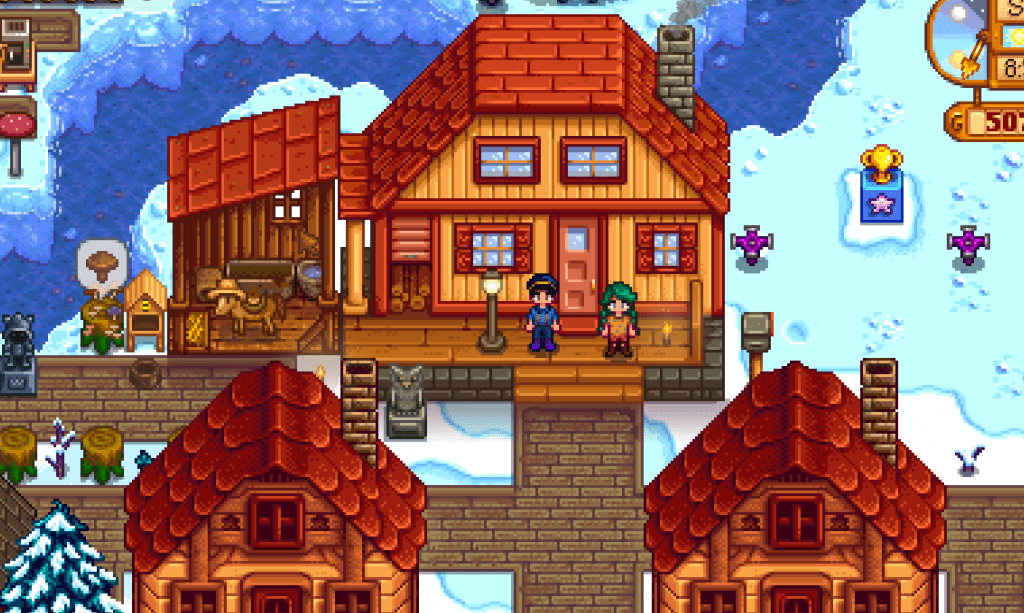
It worked! Proof of concept pics below. The original challenge was about not buying anything the first year, but I would like to expand it eventually to not selling anything either. That way the player really has to horde resources.
Thoughts on Modding with AI
The entire process took us around 3 – 4 hours. I was shocked at how little code went into setting up a restriction on buying stuff the first year. There was a bit of a learning curve with the software Rider but that’s to be expected.
I think AI was useful in helping work through points where we got stuck, but isn’t a replacement for reading documentation or exploring sites like Stardew Modding Wiki: https://stardewmodding.wiki.gg/wiki/Category:Tutorials
We have no idea what the code did, despite being able to produce something. AI was a good way to get our feet wet, but it shouldn’t supplement the learning process or thinking critically. Still, it was cool to see the code behind the game we love!
Going forward, if we decided to do another mod, we will explore how to use AI locally as opposed to a cloud based service to assist with learning how to code. No point in destroying the environment over a hobby.
Here is the code that stops the player from selling anything as well the first year:
using StardewModdingAPI;
using StardewModdingAPI.Events;
using StardewValley;
using StardewValley.Menus;

namespace NoBuyChallenge
{
    public class ModEntry : Mod
    {
        public override void Entry(IModHelper helper)
        {
            helper.Events.Display.MenuChanged += OnMenuChanged;
        }

        private void OnMenuChanged(object? sender, MenuChangedEventArgs e)
        {
            // Only apply the restriction in year 1
            if (Game1.year != 1)
                return;

            // Block any shop menu (buying/selling at NPC shops)
            // and the shipping menu (overnight sales from the bin)
            if (e.NewMenu is ShopMenu || e.NewMenu is ShippingMenu)
            {
                Game1.showRedMessage("No buying or selling in year 1.");
                Game1.exitActiveMenu();
            }
        }
    }
}